This month and next, I am departing from my regular technology, business and entrepreneurship topics and going personal. We’re going to talk plumbing. Yep, plumbing!
My wife a few weeks ago texted me a photo of our water bill for February. To my surprise and my wife’s, our water bill which usually runs about $130 was a whopping $378! Something was definitely wrong. After I came home, I checked the water meter and it confirmed my fears. The dial was spinning full speed and the meter was quickly racking up the gallons. The first step was to cut off the water to the irrigation system which I suspected to be the culprit. Instantly, the water meter stopped. So we knew the problem was there (I wondered why our flowers and bushes looked so good compared to our neighbors).
After some investigation, it was apparent that the valve that supplied our front yard was stuck and I couldn’t even turn it off by hand. The valve that supplied our backyard looked to be working fine but I decided to cut off the whole system and figure out the next steps.
Now let’s back up a little bit. Having no experience personally with irrigation systems having been born and raised in the state of Tennessee where it rains enough that no one I knew had an irrigation system, my wife and I had contacted an irrigation specialist here in Arizona last year shortly after buying the house to inspect our irrigation system before we turned it on. That specialist stated the irrigation system was good to go and we should have no worries. To make sure, last fall, I also asked our landscaper who we hired to install a new flagstone patio and some new outdoor plants to double check the system and its settings. He too signed off that everything was great. Having had 2 professionals look at the system, I felt we had nothing to worry about of course until our $378 water bill:(
So, my wife asked if we should call back one of 2 that had originally checked our system or try a 3rd specialist. You can imagine how much doubt started to run through our minds. I immediately grabbed a flashlight, went outside and started inspecting the system again. I did some research online and after some thought, I told my wife “That’s it. I’m overhauling our irrigation system!”
After she stopped laughing, she asked “What exactly do you know about overhauling an irrigation system?” My reply was straightforward and went “having grown up on a farm where being resourceful was a must, studying agriculture in college where landscaping was a required subject, having been President of my high school Future Farmers of America student group where plumbing and greenhouse management were taught all 4 years, having owned a landscaping company while in college and owning more tools than most men dream of, I think I can handle a little irrigation system.” She laughed and recommended I save the guys’ numbers, just in case.
On the next day with a shovel in hand and a drop-cloth on the ground, I started to dig. But just before I dug too far, I got an idea. What if I took photos of the project along the way and shared them with you my regular readers. So below is my journal of the project to overhaul our irrigation system!
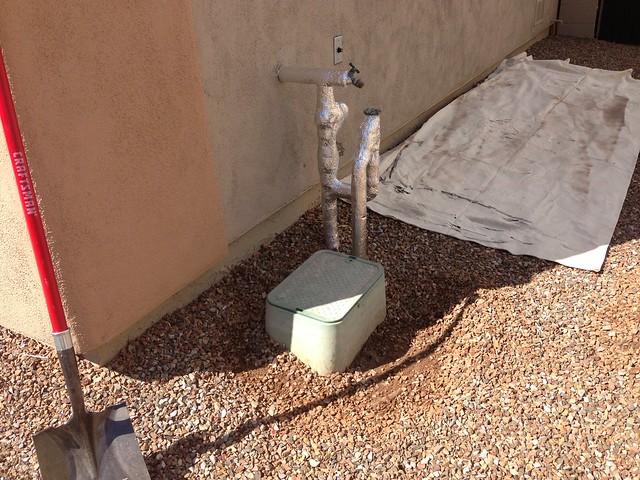
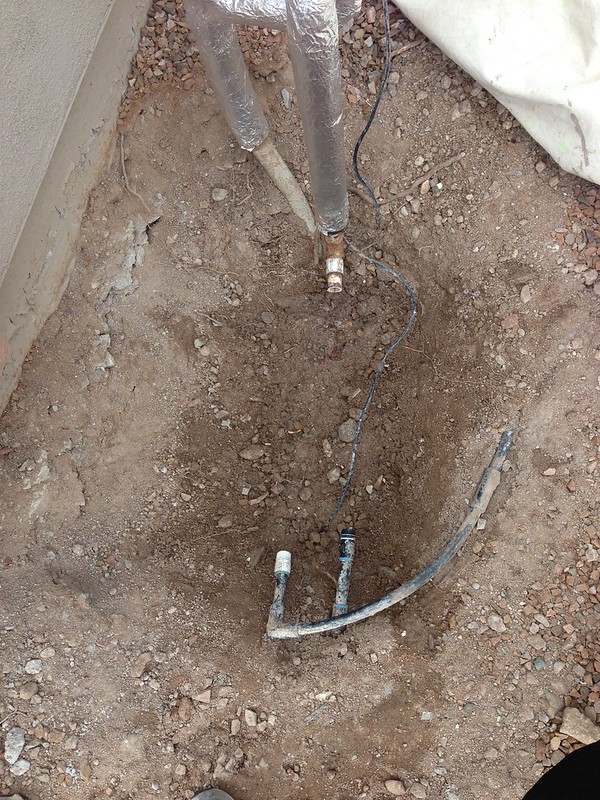
Journal Entry #1: This is how the irrigation system looked before I started. I had already shoveled a few rocks away. The rock which makes up most of the landscaping here in Arizona as opposed to lawn is about 3 to 4 inches deep. I never really liked that a green valve box was used to protect our irrigation valves yet our yard was landscaped with brown rock. I was sure to fix that if I could make it that far:)
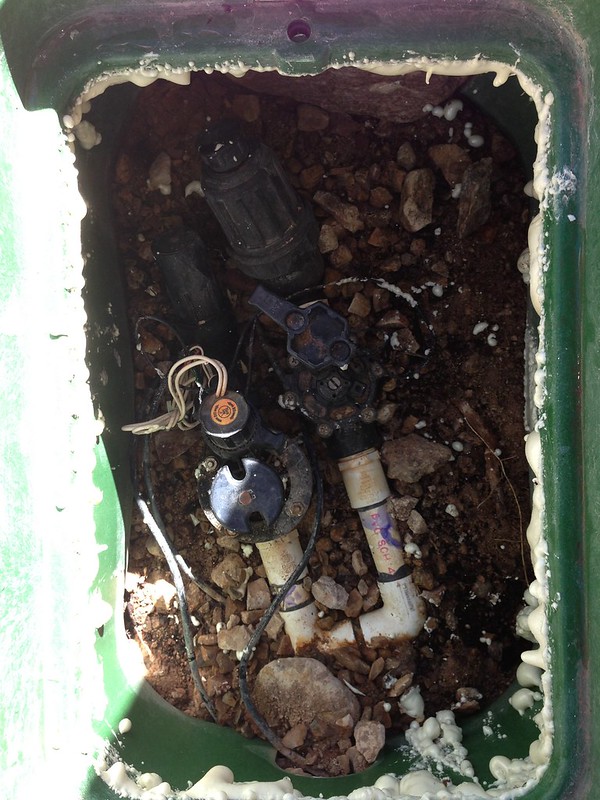
Journal Entry #2: Let’s take the top off the valve box so see we can see how the valves look inside (see image below). Yep, the valves, wiring and pipes have seen better days. After some research online, I learned the values cost about $27 each to replace. To buy a rebuild kit for one was about $25 but the other would have been about $150 so replacing was financially a better choice. However, replacing requires digging up the whole system, redoing all the plumbing while repairing would require just a few screws and 30 minutes. Given that there were 2 completely different valves each about 15 years old, I felt replacing was the wiser choice.
Journal Entry #3: The first step was to remove the green valve box to gain access to the valves and plumbing. After some digging and cutting some pipes, I was able to remove the green valve box.
Journal Entry #4: Here is a close-up of the valves and piping. A hacksaw came in very handy here helping me gain access to the valves. I didn’t have an official PVC pipe cutter but being a man that loves tools, I would solve that problem before this project was over.
Journal Entry #5: This photo shows that I officially cut off the old valves with a hacksaw from the main water feed. There is no turning back now, I am fully committed!
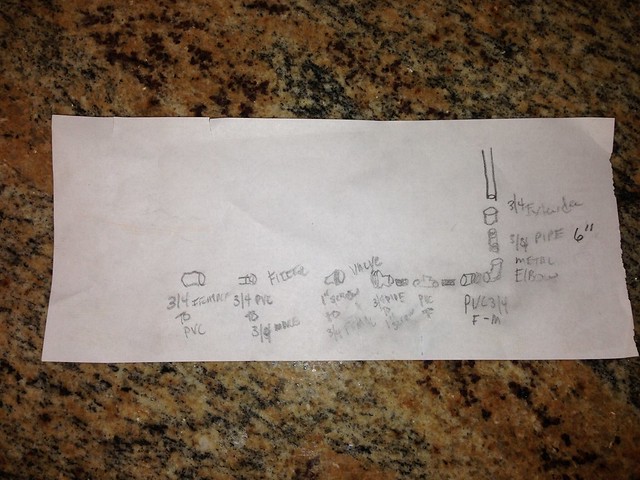
Journal Entry #6: After taking a break for lunch, I grabbed a piece a paper to plan how I would proceed with replacing the valves. I had ordered the valves and new brown valve box directly from Rainbird and those had already arrived via UPS. Next, I needed to make a run to Home Depot (one of my favorite places) to purchase the pipe fittings I needed to complete all the connections. This document is vital to make sure my I get everything I needed (a work of art ain’t it!).
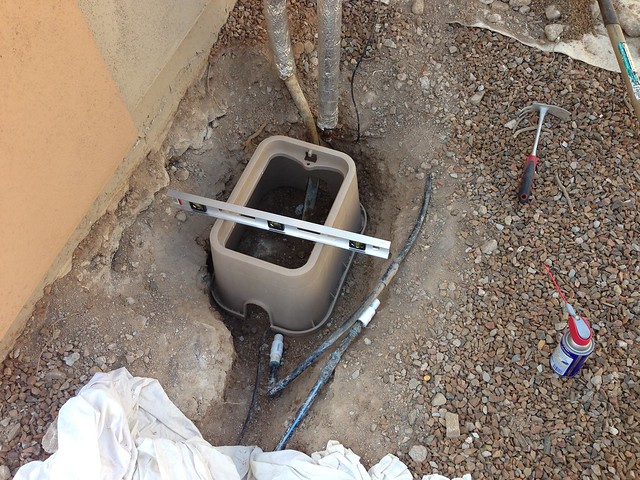
Journal Entry #7: Getting the new brown valve box level was important. Why? Because I knew my wife and neighbors were definitely going to inspect my work with a sharp eye so I needed to dot my i’s and cross my t’s.
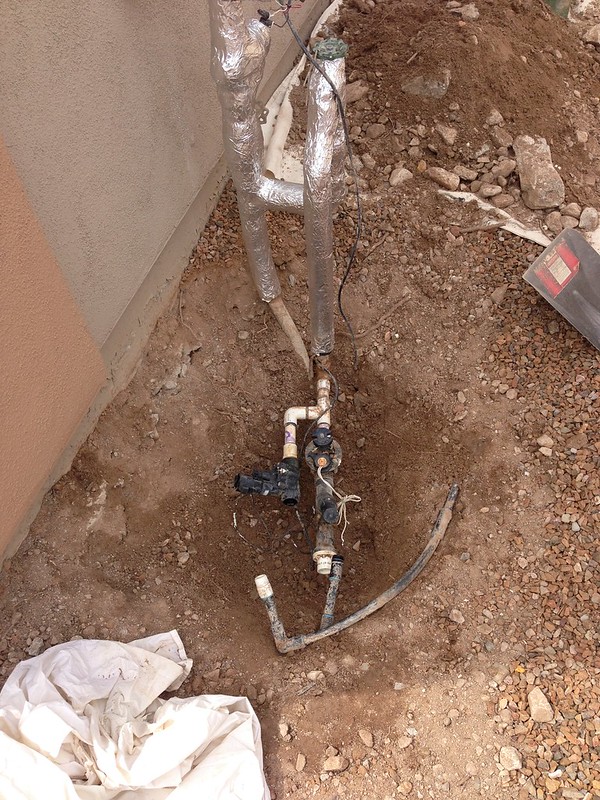
Journal Entry #8: I decided to extend the valves an additional 8 inches deeper into the ground. I felt that by lowering the valves deeper into the ground, this would provide additional protection from possible freezes that while rare can occur every few years here in southern Arizona.

Journal Entry #9: Here you can see the new 8 inch extention I installed. You will also notice I added some additional pipe to the ends of the original irrigation feeder hoses. The original installer I felt made the pipes cut to sharply toward the valves causing the hoses to crimp slightly in areas. By adding some 90 degree angles to each pipes and extending the hoses a few feet, this provided the pipes enough room to stop any future crimping.
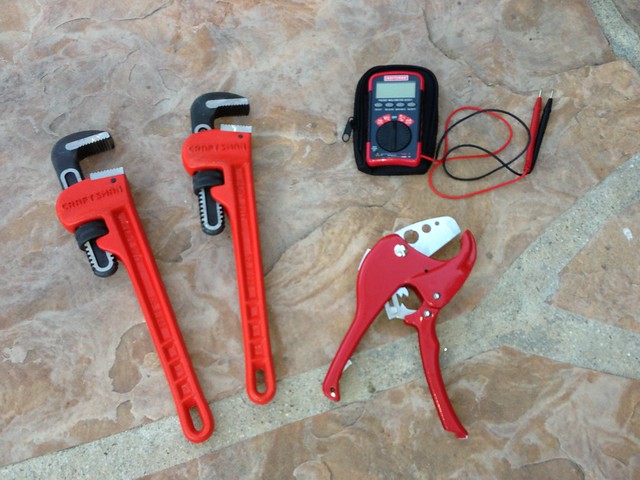
Journal Entry #10: New Tools! I had spoken with my father and we both shared that doing projects ourselves allowed us to save a lot of money. How best to spend that money? Buy new tools, of course! And you can always explain to your wife “Honey, I really needed the 2 new pipe wrenches, voltage tester and PVC pipe cutter. Because of these tools, we saved $100’s of dollars so we can get that new washer and dryer we’ve been needing!” Yep, I’m that good!
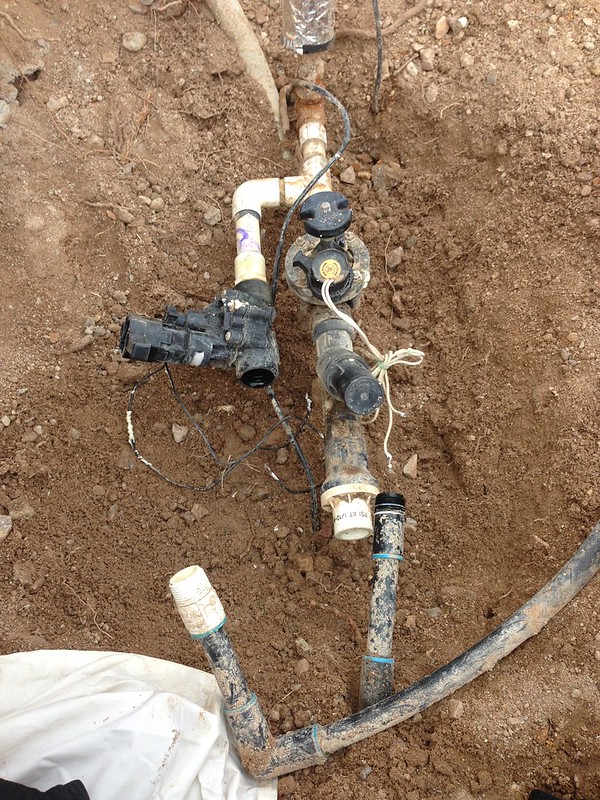
Journal Entry #11: Having lowered the valves 8 inches into the ground, I also provided enough room for about 3 inches of rocks beneath the vales. I did this for 2 reasons. 1) Having the rocks underneath the valves, this would allow for water to drain keeping the mud off the valves in the future and 2) the rocks in the winter would store heat and keep the valves from freezing for those few nights we experience temperatures below freezing.
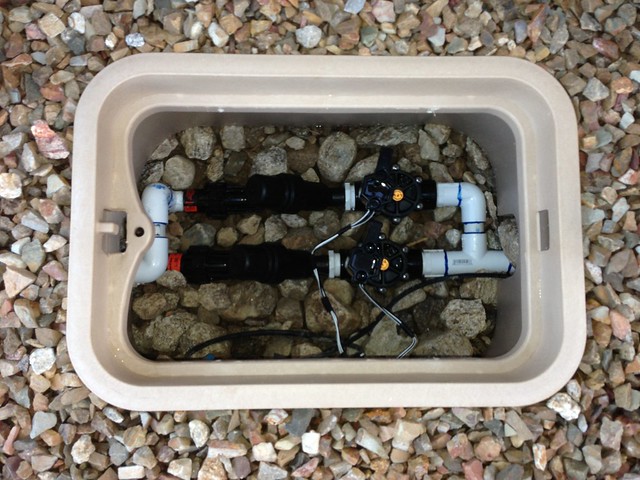
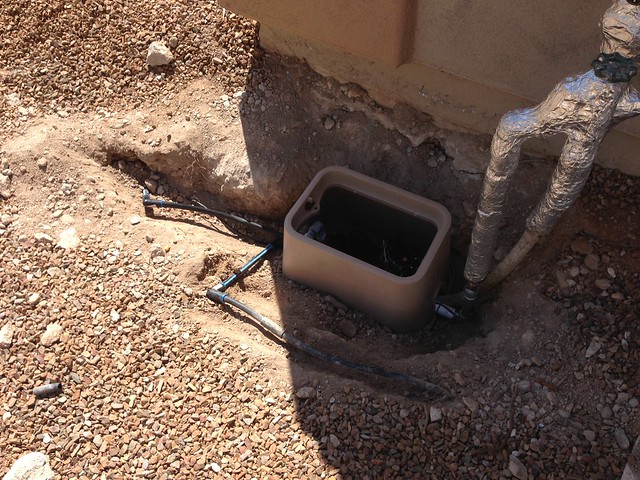
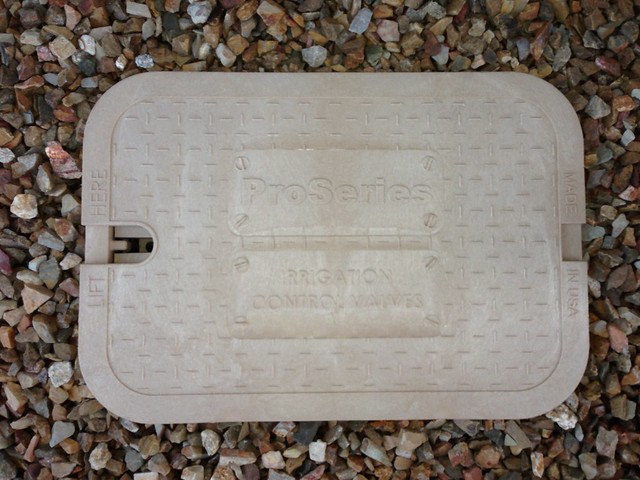
Journal Entry #12: All done! The two photos below show how the job looked upon completion. After having 3 neighbors come by asking if I really knew what I was doing, I am sure they were relieved seeing the big hole in our yard, the cut pipes, miscellaneous tools scattered, pile of dirt gone and their real estate values preserved, I and my project were no longer the talk around dinner tables. I had ordered the new brown valve box for 2 reasons: 1) it was Made in the USA (every part used in this project was 100% American made) and 2) because it had the word “ProSeries” on it. Yep, “Pro” is how I roll!
So as you can see, replacing an irrigation system is possible. Be sure to come back next month where I share photos of my latest project: installing 6 large outdoor mexican planting pots along with beautiful plants plus how I hooked them up to our brand new irrigation system. (To read the article titled ‘Mexican Pots For Our Arizona Home’, click here.)
Curious if our water bill went back to normal after these repairs? Yes indeed, our next month’s water bill was back to $130 plus the water company refunded us $250 since we repaired the damage. In the end, everything turned out great!
1 comment
Mike Smith
I always knew you were brilliant! Always use pro stuff made in the USA. Good boy..
The irrigation system I installed at my new place yesterday is a 50′ soaker hose. I don’t think you need a photo to see how bad it looks. The joys of elderly living:)
Comments are closed.